• WELCOME
  • Blog "The Journey"
  • IN THE WOODS
  • LET'S METAL
  • A SIGN OF THE TIMES
  • CARVINGS AND DIMENSIONAL PIECES
  • DIMENSIONAL SIGN AND SIGN COMPONENTS
  • CONTACT
  • STILL BUILDING
Sawdustnsparks.com       603-356-9080

Back to the Barn

3/11/2012

0 Comments

 
Picture
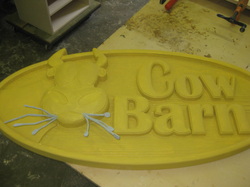
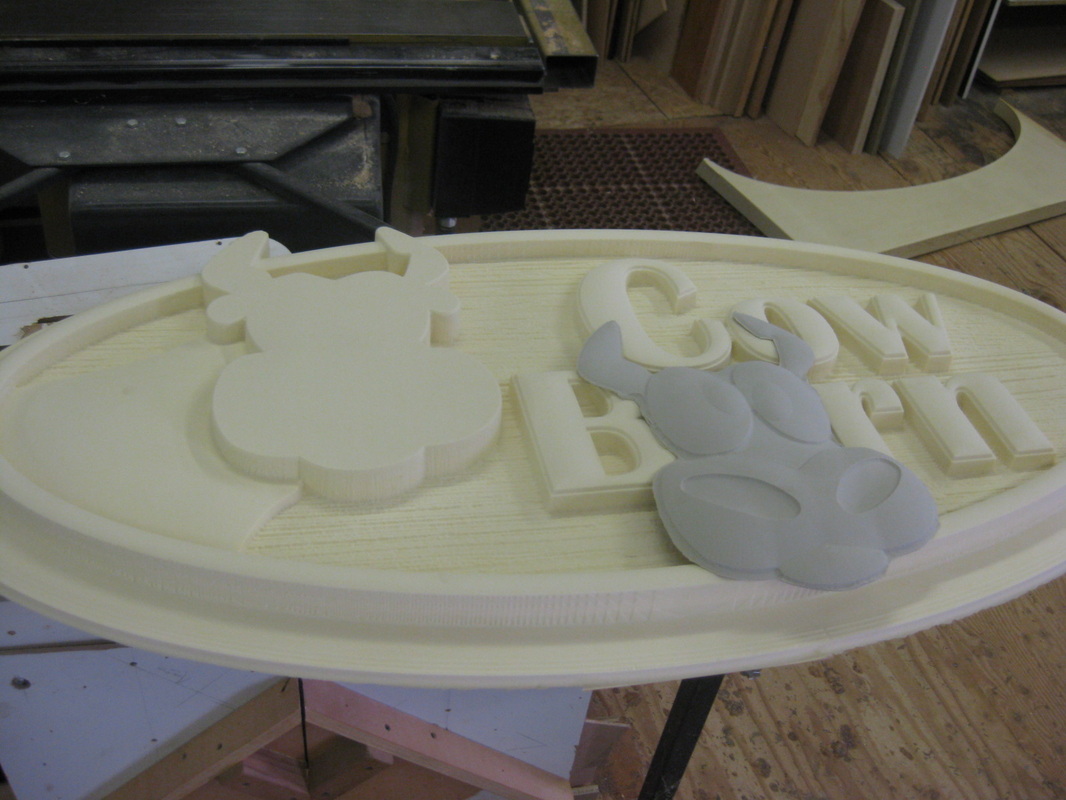
At this point I have applied 1 coat of HDU Primer and sanded that after it had a chance to dry.
Then I applied a base coat of paint, This color is mostly for the wood grained texture background, but I'ts just as easy to apply this base coat to the entire piece as it adds another layer of paint to the sign, Plus I don't need to worry about cutting in any edges yet.
 As you can see this process was making the cow pretty hungry so I thought I'd give him some oats.

Picture
Now we're cooking with Gas!
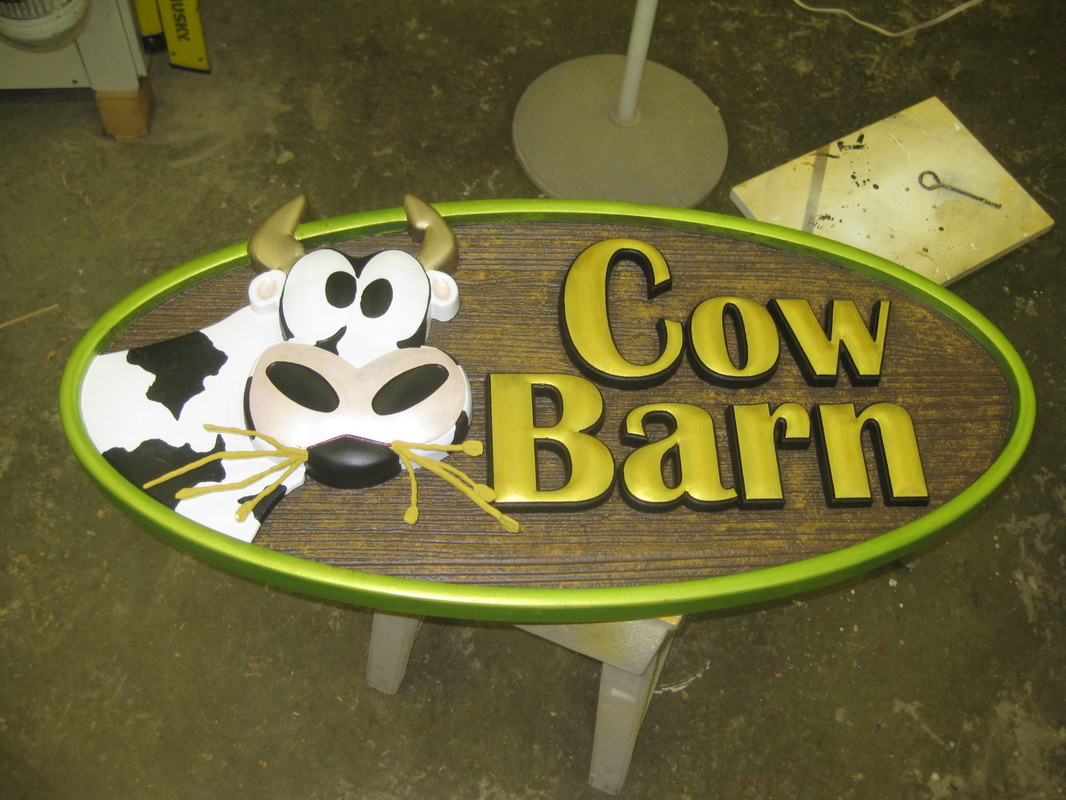
Really starting to take on some life, It's amazing what color can do.
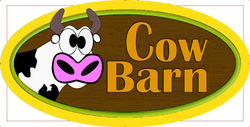
The basics are here but It still needs a few more coats, the lettering, the snout (pink), the black spots and the green border.
The wood grain, the white and the black lettering outline are complete.

The last detail will be sowing The wild Oats stay tunned:
0 Comments

Saving Face

3/4/2012

0 Comments

 
Because of the thickness of this sign (3") and the material I have to cut it out of I had to extract 2 slices from the design using enroute. Below is a screen shot of the front view of the sign in Enroute.
Picture
In this shot the red rectangle represents the size of the plate,( material that I'm going to cut this out of), as you can see the face of the cow stands above the plate.
I made 2 slices with the first one being 2" thick and the remaining piece can cut out of a piece of 1" material.

Picture
once slices are complete and toolpathed it's off to the Multicam (router).
Look Ma No Face!
This was a big file with all the textures etc. It took the router 7 hours to cut this piece. ( this is when you hope the power dosen't go out !)

Picture
Both pieces ready to be glued together using "Gorilla Glue", a urethane glue that works well with the Urethane foam.
Picture
When all parts are cut I'm using my vac clamp, which is a giant bag that you suck all the air out of and the atmospheric pressure applys a tremendous amount of force which clamps everything in place. This is a great system for clamping odd shaped parts that you could not get conventional clamps on, and it creates equal pressure all over the parts.
This similar type of system (without the bag) is what is used to hold the parts on the router table when it's cuttting.
The other advantage to this type of clamping is thatthe Gorilla Glue expands as it cures and can really make a mess, The bag that holds the parts in place contains the expansion of the glue and makes for easier clean up of the glue line.

Once again I ask should I do a video of glue drying?

0 Comments

Heading To The Barn

2/29/2012

0 Comments

 
Picture
A good freind of mine Makes these awesome life sized Cows, and sends them all over the world.
He asked me if I would do a small sign for his workshop
Even though he is more than capable of doing his own, his only restriction is the software that he uses for his router doesn't have the ability to do true 3D carving like I can with Enroute.
He has always been amazed at what I've been able to accomplish using Enroute software so He wanted to see what I could do with his sign.
I started by Importing the above artwork from his web site into Enroute, then traced over the cow using the drawing tools in Enroute.


Picture
I then separated the areas of the drawing that I wanted to treat differently,(by making various types of reliefs etc.) 
I added some text and a background to the text, and a woodgrain texture (from Dan Sawatzky's Texture Magic Collection Of Bit Maps).
 to the main body of the sign which is a dished in surface. I also added the raised boarder around the perimeter of the sign. ( the extreme yellow band on the outside is not going to be part of the finished piece, the cows horns will be sticking out in mid air. this boarder is only there so I had a surface to build the horns on). The total thickness of this sign is about 3-1/4 inches its hard to see that in these shots.

Picture
Once I had everything build as I wanted in Enroute I took a screen shot of the finished relief and imported it as a jpeg into Inkscape (which is a free drawing program, similar to photoshop) and applied some colors to the piece to give it the finished look.
Now If I Can Get My Computer Back from the doctor I'll start the process of making this sign.

0 Comments

    Author

    Donald A. Johnson

    Picture
    This is an on going story of my explorations into the artistic world,chronicling the process of this journey.    Highlighting my successes as well as my failures. I'll try not to focus on the failures, but they are what has taught me the most.
      I Owe the ability to take this journey to; My Mom
    (for she bred in me a drive and creativity required for this type of trip) My Incredible Wife and Children for their support, and to the world of creative people that inspire me everyday.
     One in particular is Dan Sawatzky (click here to meet Dan) This Guy has Changed the way I look at things. He is truly an artist and a Visionary with passion.

    Archives

    June 2014
    April 2014
    March 2014
    January 2014
    October 2013
    June 2013
    January 2013
    December 2012
    November 2012
    October 2012
    September 2012
    August 2012
    July 2012
    June 2012
    May 2012
    April 2012
    March 2012
    February 2012
    January 2012

    Categories

    All
    Around The House
    A To Z
    Barge
    Benji
    Brewing Up A Storm
    Chamber Plaques
    Cow Barn
    Detzer
    Dragon's Lair
    Elfs Lodge
    Elf U
    Excavator
    Glen Junction
    It Does'nt Always Go Well.
    Moat Mountain
    Sawdustnsparks Sign
    Shop Helpers
    The Vault
    Towers Steeplejacks
    Trade Show Booth
    Tree Amigos
    Up In Arms

    RSS Feed

Powered by Create your own unique website with customizable templates.